The editor
The editor is where captures come together: put several on one canvas, arrange them, connect them with arrows, number the points, add a label, and copy the result as one picture.
Keys are written as on a Mac. On Windows, ⌘ is Ctrl.
When it opens
The first capture opens the editor. Every capture after it, by a key, the menu or the Add button, lands on the same canvas, to the right of the others, and brings the window forward. There is one editor and one canvas at a time.
The window
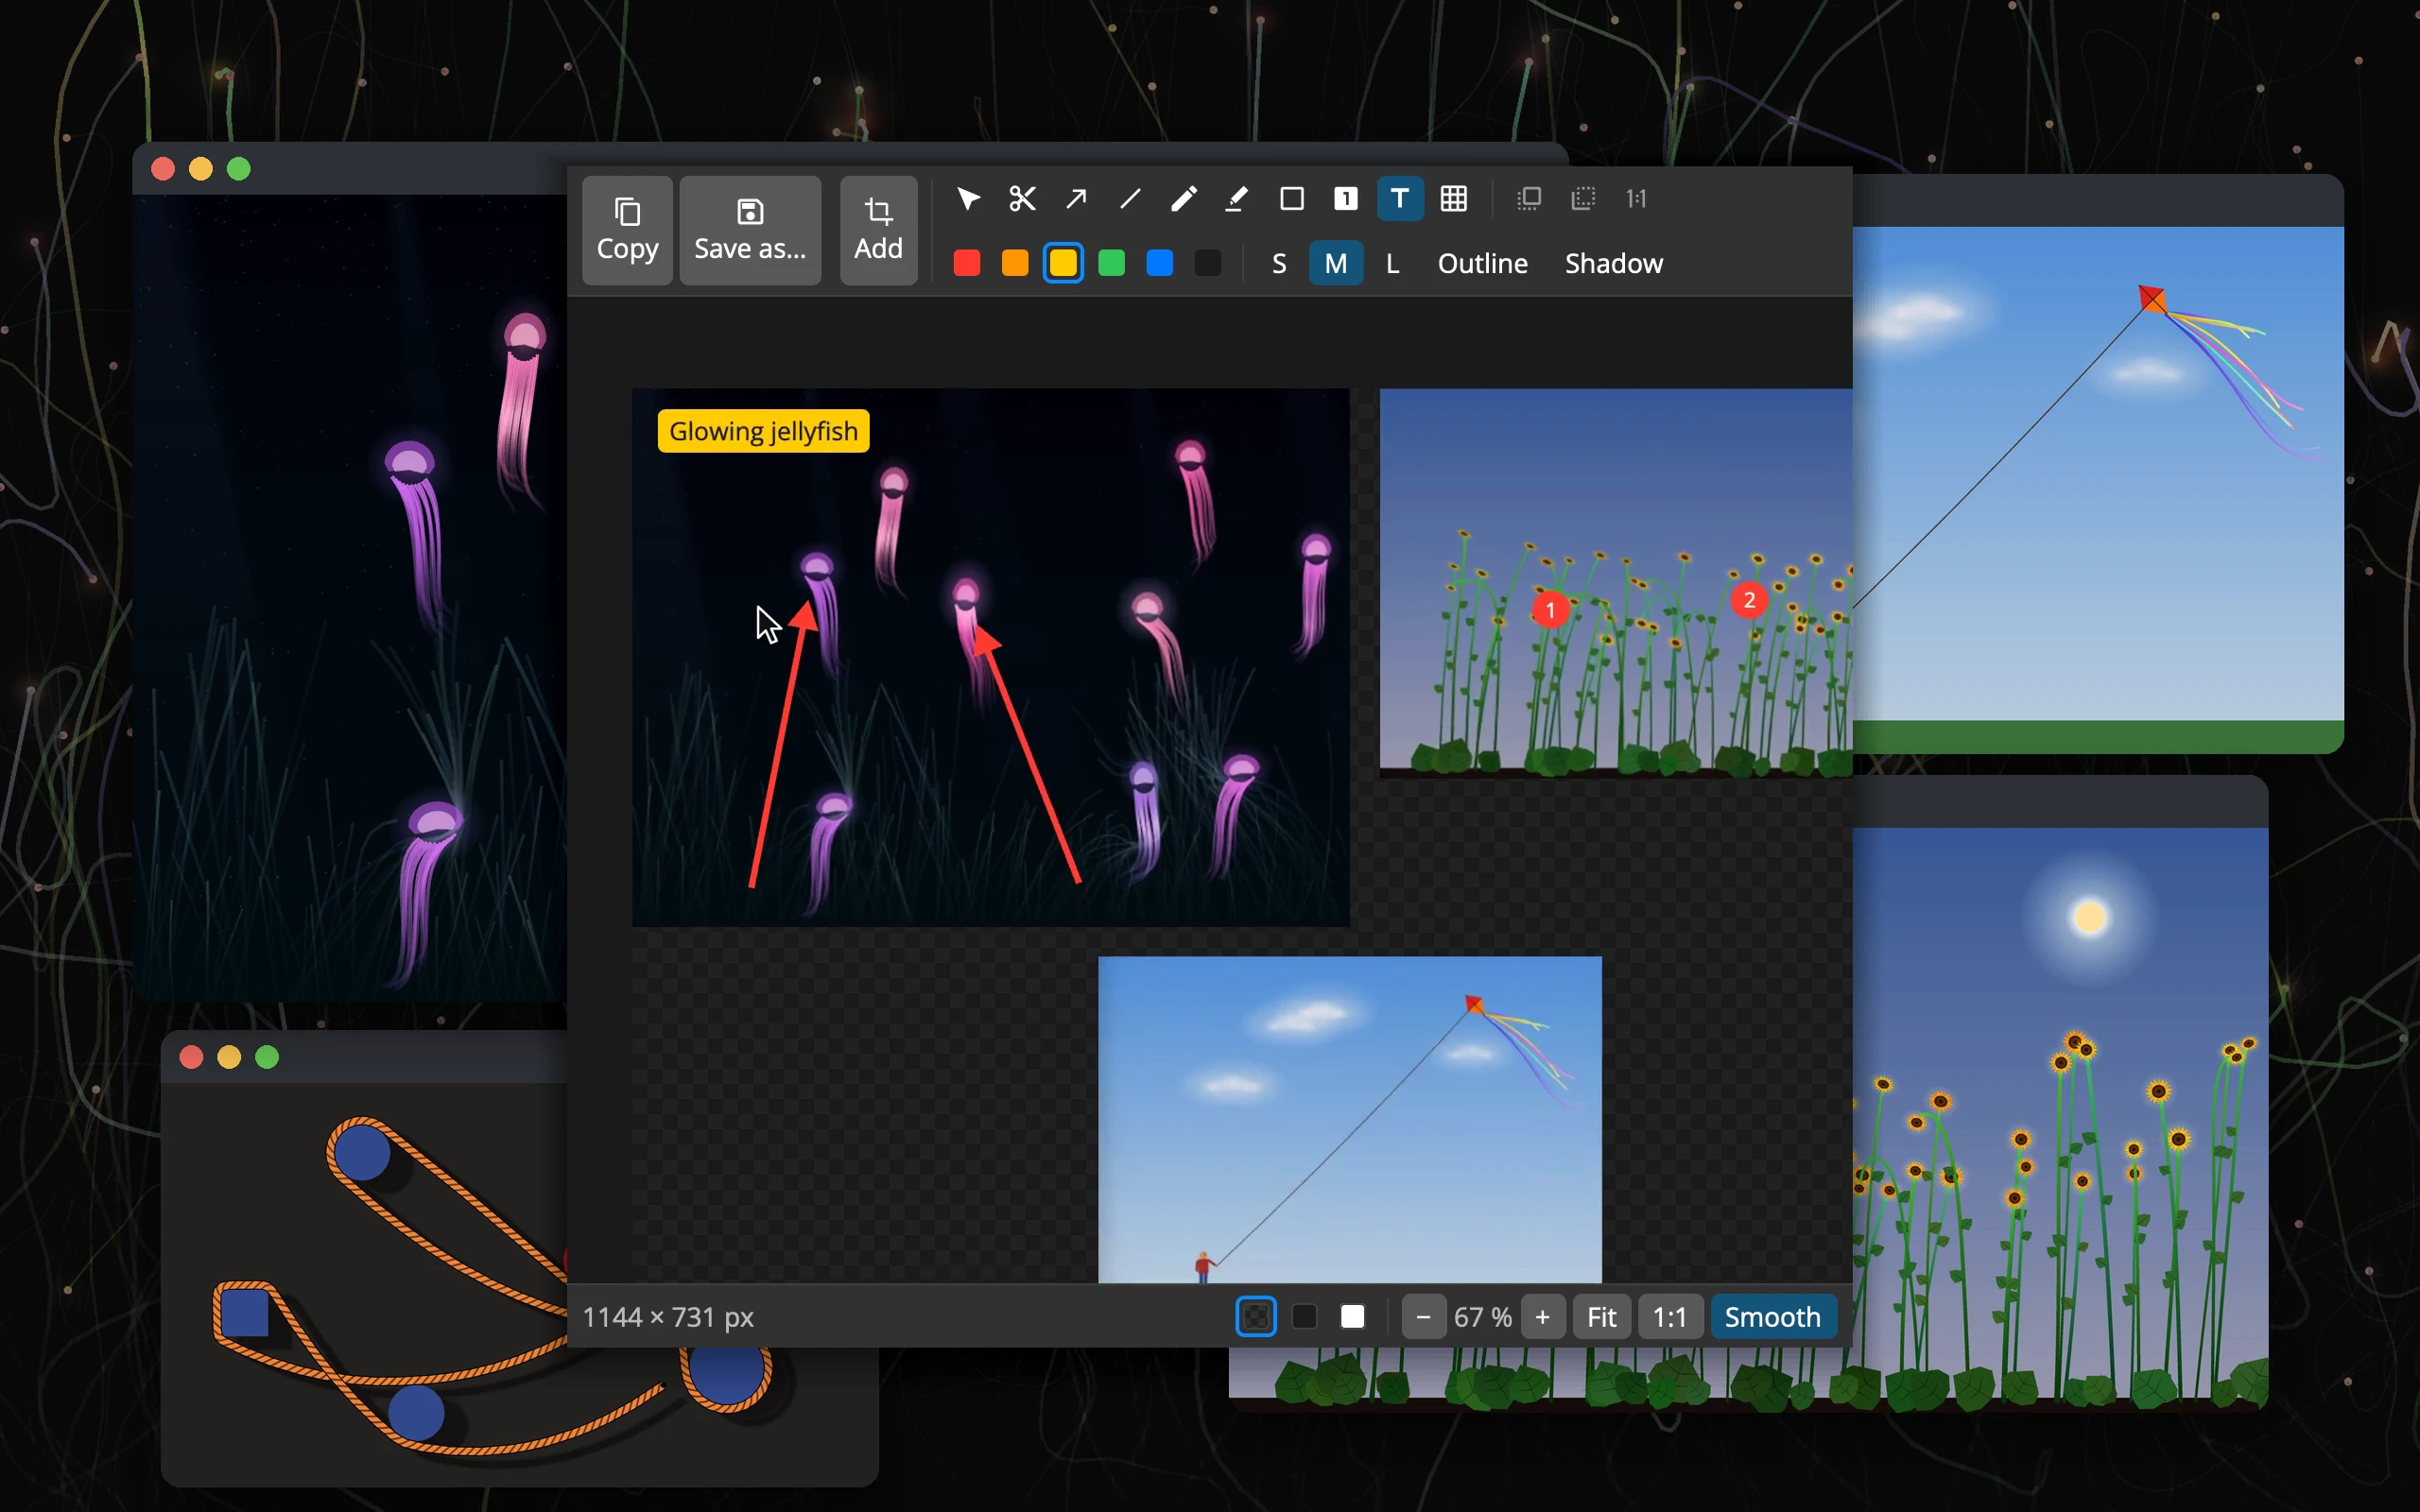 1234567891011
- 1Copy, Save as… and Add: the picture out, or another capture in
- 2Tools: select, crop, arrow, line, pen, highlighter, frame, number, text, blur
- 3Order and own size
- 4Colours
- 5Weight, Outline, Shadow
- 6A label
- 7Arrows
- 8Numbered points
- 9The picture: everything on the canvas, as Copy makes it
- 10Its size in pixels
- 11Background and zoom
The canvas has no edges: it grows to hold whatever is on it. The area that holds everything, drawn as a checkerboard (or dark or light, as the background is set), is exactly the picture Copy and Save as… make. The bottom bar says how big it is in pixels, such as 1144 × 731 px.
Arranging captures
With Select V:
- Click a capture to select it, ⇧-click to add more. A click on empty canvas clears the selection.
- Drag to move. The arrow keys move the selection by a point, with ⇧ by ten.
- Resize a single selected capture by its corners and edges. It keeps its proportions.
- Shots at Their Own Size (the button beside the order buttons) puts resized captures back to their real size.
- Bring Shots to Front ⌘] and Send Shots to Back ⌘[ change which capture lies over which.
- ⌦ or ⌫ deletes the selection.
Crop C: click a capture, then drag its corners or edges in. The part cut off is dimmed while you crop, and nothing is thrown away: crop again to pull an edge back out.
Add ⌘N hides the editor for a moment and starts an area capture; Esc comes back with nothing added.
Marking up
| Tool | Key | What it makes |
|---|---|---|
| Select and Move | V | Picks, moves and resizes |
| Crop a Shot | C | Cuts a capture’s edges |
| Arrow | A | An arrow, dragged from tail to head |
| Line | L | A straight line |
| Pen | P | A freehand line |
| Highlighter | H | A see-through stroke; straight with ⇧ |
| Frame | R | A rectangle outline, dragged corner to corner |
| Numbered Point | N | A circle with the next number: 1, 2, 3… |
| Text | T | A label in a coloured box |
| Blur | B | A mosaic over part of a capture |
A tool stays on until you pick another or press Esc. What you just made stays selected, so a click on a colour or a weight changes it right away.
- Colours: six of them. Text on a light colour is dark, on the others white. The colours themselves are set in Preferences ▸ Theme, and changing them there recolours marks already made.
- S, M and L: the weight of lines, the size of labels and numbers, the coarseness of blur.
- Outline adds a thin black edge, so a mark stands out on any background. Shadow puts a soft shadow under captures, labels and numbers.
- Select a mark and its style shows in the bar; click a colour, weight, Outline or Shadow to change every selected item at once.
Each tool
- Arrows and lines have a grip at each end to move them. They don’t stick to captures: moving a capture leaves them where they are, so arrange the captures first, then draw.
- Numbered points count in the order you place them, across the whole canvas. Delete one and the rest renumber themselves.
- Labels: click and type; Enter starts a new line, a click elsewhere or Esc finishes. To change one, double-click it, or select it and press Enter. A label left empty disappears.
- Blur belongs to its capture: it moves and resizes with it, and goes when the capture is deleted. The picture you copy holds the mosaic, not what was under it, so blurred text can’t be read back.
- Frames are outlines only; click their line to select them. They resize freely.
- Pen and highlighter strokes are smoothed, and can be stretched by their grips.
Marks always lie over captures, in this order from the bottom: highlights, frames, arrows and lines, labels, numbers.
Undo and redo
Undo ⌘Z and Redo ⇧⌘Z (Ctrl+Y on Windows), up to 100 steps. Every change counts: an added capture, a crop, a move, a new colour. Zooming and panning don’t.
Esc does the first of these that applies: cancels a drag, finishes a label, switches back to Select, clears the selection. It never closes the window.
Zoom and pan
- The wheel zooms around the pointer, a step for each notch, the canvas gliding there, from 5 % to 3200 %.
- On a trackpad, pinch to zoom and slide two fingers to pan. ⌥ with any scroll zooms, which is how a Magic Mouse zooms.
- = and - zoom in and out, 0 fits everything in the window, 1 shows the captures as large as on the screen.
- Drag over empty canvas to pan, or hold Space and drag anywhere.
- Smooth S smooths enlarged captures on screen; off, you see the pixels. It changes only the view, never the picture.
Getting the picture out
Copy ⌘C puts the whole canvas on the clipboard as one PNG picture, ready to paste into Slack, Teams, Discord, an email or an AI chat. Save as… ⌘S saves the same picture as a PNG file, named after the moment you save it, like optic-20261114-093012.png.
- What is in it: every capture and mark, with their shadows, cropped tight. No frame, padding or shadow is added around it.
- Background: where nothing is, the picture is Transparent, Dark or Light, as the swatches in the bottom bar say. Many apps show a transparent picture on white.
- Sharpness: captures taken in points, the default, have one pixel per point. Captures taken with the Inspector set to px keep every pixel of a Retina screen, and one of them makes the whole picture that fine: the others are enlarged to match, and marks and text are drawn at that size, so they stay crisp. See Capturing.
- @2x: a Retina picture is marked as such, so apps that care show it at its true size, and its suggested name ends in
@2x.png. - A picture over 16,384 pixels on a side isn’t made, and the bottom bar says so. A save that fails says so there too, and the canvas stays open.
Closing the editor
⌘W or the window’s close button closes the editor, and the canvas goes with it: there is no history and nothing is kept. The next capture starts a new canvas. Copy or save what you want to keep first.
Preferences ▸ Editor ▸ Ask about unsaved edits makes Optic ask before closing a canvas you haven’t copied or saved since your last change, and before quitting with one. To start over without closing, delete what is on the canvas.
Editor preferences
| Setting | What it does | To start with |
|---|---|---|
| Folder | Where Save as… starts; it follows the folder you saved into last | Desktop |
| Background | Transparent, Dark or Light where nothing is | Transparent |
| Mark @2x pictures | Retina pictures are marked and named @2x | Yes |
| Close the window after copy or save | For a quick capture, copy, done | No |
| Ask about unsaved edits | Before closing a canvas not yet copied or saved, or quitting with one | No |
Tips
- Arrange first, then draw: arrows and numbers don’t follow captures that move.
- One quick picture: capture, ⌘C, paste. With Close the window on, the editor gets out of the way by itself.
- Hide a password or a name: Blur it. What you send holds only the mosaic.
- Line things up exactly: select a capture and nudge it with the arrow keys.